Issue a ISO Sensor Token with Rewarding System on Moonchain
This comprehensive tutorial demonstrates the process of issuing an ISO Sensor Token on the Moonchain blockchain. You will learn how to deploy a MEP804 (Sensor Token) smart contract and set up a system service for granting rewards based on sensor data transmitted from an X2E board. The tutorial will guide you through each step, from initial setup to final deployment, ensuring you understand the intricacies of blockchain technology and smart contracts. Additionally, you will gain insight into how sensor data can be utilized to trigger reward mechanisms, providing a practical application of the ISO Sensor Token in real-world scenarios. By the end of this tutorial, you will be well-equipped to deploy your own sensor tokens and integrate them with IoT devices for innovative and efficient data management solutions.
German
English
Moonchain Info
Contract proposals: https://github.com/MXCzkEVM/MEPs
Deployed Contract addresses:
MEP801: 0x070B3e2229a27CDd34126E96B2Ce65c63BD1A5CE
MEP802: 0x28479D68cD3ef5661BDB7505EFD1712D5D0951F6
MEP803: 0xBFc77Ee5959699eC4171891b625D6EccdC9e00cD
MEP804 example: https://github.com/MXCzkEVM/iso-sensor-token-example
The commands in this document use the wallet address 0xa2d9E584F4cF0167d283dB6EB4922082269B6bB7 as an example. You can replace this address with your own wallet address and private key. Please ensure you have MXC to cover gas and other transaction fees.
Private key:
318dee0c207c20f4767e342a52e876b816379334a53277773c783b0e9348d368
Prepare an X2E board
If you don't have an X2E board that sends temperature readings, please follow the instructions in SetupX2E.md to set one up for this tutorial.
You will need the pidZkevmHash for the following steps, as it serves as the unique identifier for your X2E board on the Moonchain.
The commands in the later examples use the following pidZkevmHash.
0xf6d4bda9e25797a1423a41c485bfaa8e03930f0dbdf2d2b324d79fa71d8c9108
Mint the sensor NFT for the X2E board
Check the price for minting a sensor NFT.
cast call 0x28479D68cD3ef5661BDB7505EFD1712D5D0951F6 "priceInfoList(uint256) (uint256,uint,bool)" 0 --rpc-url https://geneva-rpc.moonchain.com --private-key 318dee0c207c20f4767e342a52e876b816379334a53277773c783b0e9348d368
The response will similar as below. The first line is the price. 9876500000000000000 equal to 9.8765 MXC.
9876500000000000000
0
true
Mint the NFT by replacing 0xf6d4bd... with the pidZkevmHash you received for your X2E board.
cast send 0x28479D68cD3ef5661BDB7505EFD1712D5D0951F6 "mintSensorNFT(uint256,uint256,string)" 0xf6d4bda9e25797a1423a41c485bfaa8e03930f0dbdf2d2b324d79fa71d8c9108 0 "https://global.matchx.io/iso/x2e/x2e_ref_sensor.jpeg" --rpc-url https://geneva-rpc.moonchain.com --private-key 318dee0c207c20f4767e342a52e876b816379334a53277773c783b0e9348d368 --value 9876500000000000000
After Sensor NFT minted, you are ready to send data to the X2E board via Moonchain.
To repeat the minting process, you must first burn the Sensor NFT.
cast send 0x28479D68cD3ef5661BDB7505EFD1712D5D0951F6 "burnSensorNFT(uint256)" 0xf6d4bda9e25797a1423a41c485bfaa8e03930f0dbdf2d2b324d79fa71d8c9108 --rpc-url https://geneva-rpc.moonchain.com --private-key 318dee0c207c20f4767e342a52e876b816379334a53277773c783b0e9348d368
Build and deploy the ERC20 Token
Download the MEP804 example to your working directory. Be sure to read the README file to set up the environment for smart contract compilation and deployment.
mkdir ~/working
cd ~/working
git clone https://github.com/MXCzkEVM/iso-sensor-token-example.git
cd iso-sensor-token-example
Install dependencies.
yarn
Compile the MEP804 contract
npx hardhat compile
Run the test to verify that the functions are working correctly.
npx hardhat test
Set the private key for deployment.
export DEPLOYER_KEY=318dee0c207c20f4767e342a52e876b816379334a53277773c783b0e9348d368
Deploy the contract.
npx hardhat --network mxc_testnet run deploy/deploy_MEP804v1.ts
On success, you will get the address of the deployed MEP804 smart contract.

Verify the contract. This will help you to view the transaction on the Moonchain explorer.
npx hardhat verify --network mxc_testnet 0x84b09Fa524BD619B0Af7dF1fde6D42ca3Bd6425E
You will got an "Etherscan API call failed with status 400." error when process the Proxy. You may ignore it as the contract are verified on Moonchain anyway.
After that, you can view the smart contract at Moonchain explorer (geneva testnet).
https://geneva-explorer.moonchain.com/address/0x84b09Fa524BD619B0Af7dF1fde6D42ca3Bd6425E
Issuing a ISO Sensor Token
Set contract addresses and private key for the scripts to use.
export PROXY_MEP801=0x070B3e2229a27CDd34126E96B2Ce65c63BD1A5CE
export PROXY_MEP802=0x28479D68cD3ef5661BDB7505EFD1712D5D0951F6
export PROXY_MEP803=0xBFc77Ee5959699eC4171891b625D6EccdC9e00cD
export PROXY_MEP804=0x84b09Fa524BD619B0Af7dF1fde6D42ca3Bd6425E
export DEPLOYER_KEY=318dee0c207c20f4767e342a52e876b816379334a53277773c783b0e9348d368
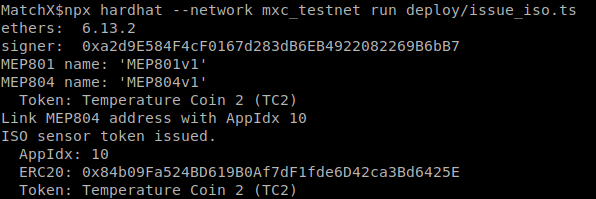
Run the script to issue a ISO Sensor Token
npx hardhat --network mxc_testnet run deploy/issue_iso.ts
Use the X2E to join the mining of the Sensor Token
Set AppIdx to the minted X2E NFT.
cast send 0x28479D68cD3ef5661BDB7505EFD1712D5D0951F6 "setApplicationIdx(uint256,uint256)" 0xf6d4bda9e25797a1423a41c485bfaa8e03930f0dbdf2d2b324d79fa71d8c9108 10 --rpc-url https://geneva-rpc.moonchain.com --private-key 318dee0c207c20f4767e342a52e876b816379334a53277773c783b0e9348d368
0xf6d4bda9e25797a1423a41c485bfaa8e03930f0dbdf2d2b324d79fa71d8c9108 is the pidZkevmHash of your X2E board. 10 is the AppIdx.
Wait a few minutes after the X2E board sends data, then use the following command to verify that the temperature reading (temp_0) is reaching the ISO Sensor Token Application (10).
curl https://chirpvm.matchx.io/iso/api/application/10/1/temp_0

Run the rewarding service
The rewarding service processes sensor data received from ChirpVM and calculates the corresponding reward. This data, along with the calculated reward, is then submitted to Moonchain, with the calculation typically occurring every few hours.
Once the reward is received, the sensor owner can claim their sensor tokens, usually doing so once a day or every few days.
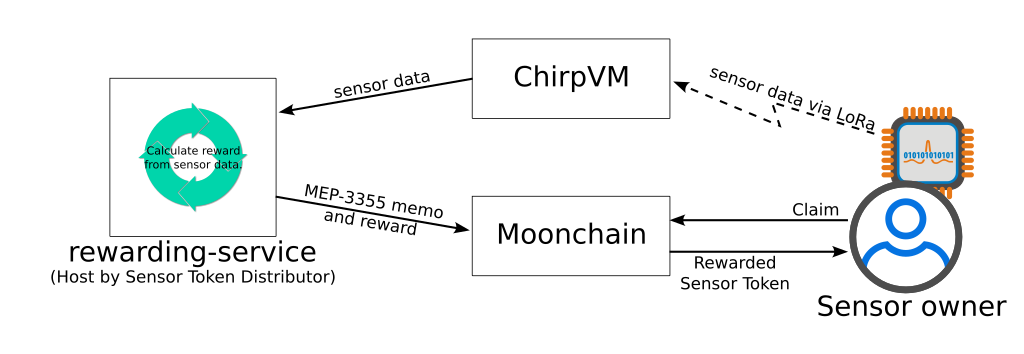
In this example, the service gathers active sensor data from ChirpVM, which is sending temperature readings (temp_0). It then grants a sensor token to the sensor owner.
Set the AppIdx you got from previous for the service.
export TARGET_APPLICATION_IDX=10
Run the service.
npx hardhat --network mxc_testnet run rewarding-service/main.ts
Since your X2E has already sent data, the rewards service will grant you a reward for this submission.
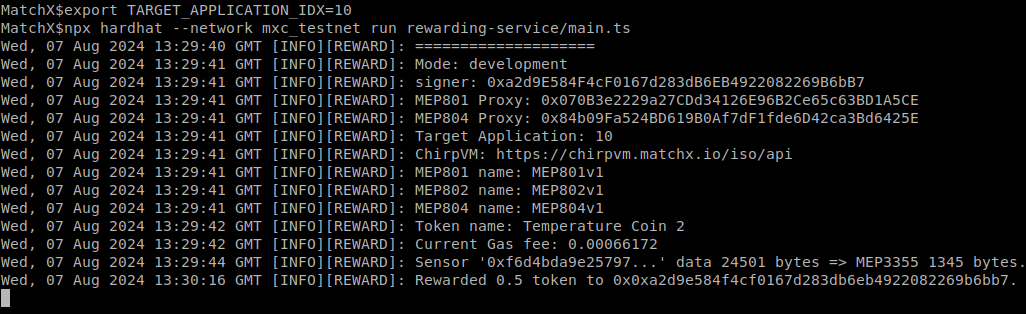
If you keep the X2E board and the service running, you'll receive the next reward in one hour.
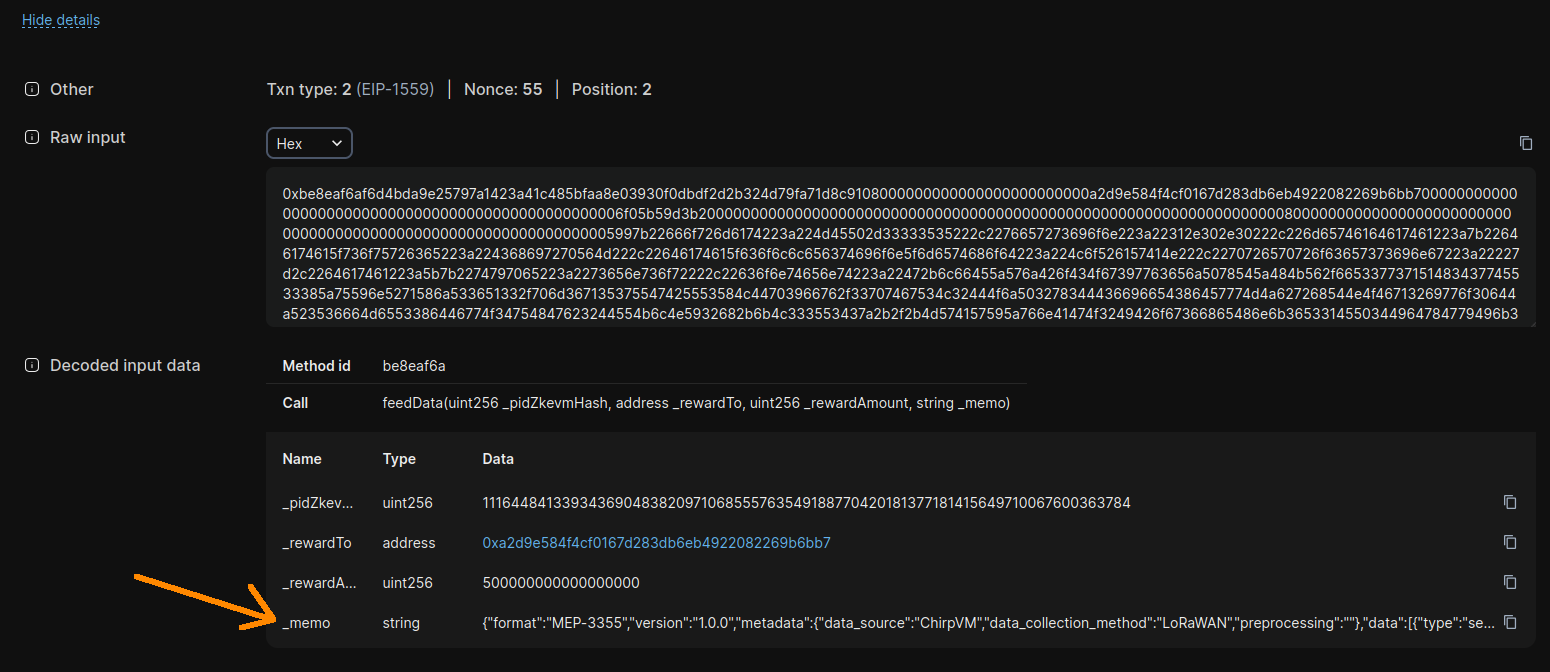
You can check the sensor data on Moonchain explorer by going to the contract.
https://geneva-explorer.moonchain.com/address/0x84b09Fa524BD619B0Af7dF1fde6D42ca3Bd6425E
Find the transaction of feedData method.

Click into the transaction, and scroll down to show the details. The _memo is the sensor data in MEP-3355 format.
Claim the reward
The following command will transfer the rewarded ISO Sensor Token to your wallet.
cast send 0x84b09Fa524BD619B0Af7dF1fde6D42ca3Bd6425E "claimReward()" --rpc-url https://geneva-rpc.moonchain.com --private-key 318dee0c207c20f4767e342a52e876b816379334a53277773c783b0e9348d368
Check the balance.
cast call 0x84b09Fa524BD619B0Af7dF1fde6D42ca3Bd6425E "balanceOf(address) (uint256)" 0xa2d9E584F4cF0167d283dB6EB4922082269B6bB7 --rpc-url https://geneva-rpc.moonchain.com --private-key 318dee0c207c20f4767e342a52e876b816379334a53277773c783b0e9348d368
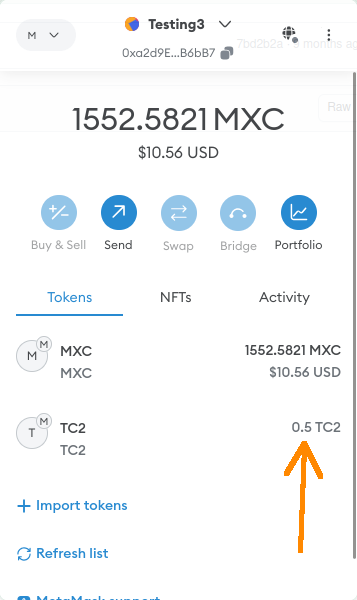
Add the ISO Sensor Token to Metamask
You may import the ISO Sensor Token to your Metamask wallet.
Click "Import tokens" to start.
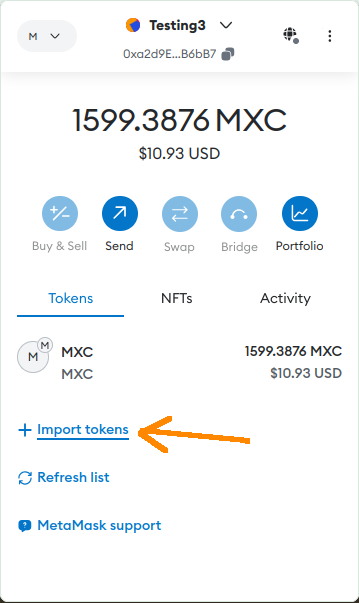
Set the MEP804 (ERC20) contract address.

After that, you can see the reward you earned.